Introduction
If you have been following along over the years, you know that I have wanted to go completely off-grid as much as possible. That goal is expensive and (like most people) we are not independently wealthy. So, I continue to do the very thing I recommend to everyone: do what you can when you can, and, when you can do more, do more.
When you live on a budget, the most important thing about producing your own electricity is preparing for the day when you can actually purchase the equipment to achieve that goal. Solar arrays, wind turbines, geothermal heating/cooling... all of these things get more expensive the higher the output you need.
Please excuse the following section in regard to 'backtracking' and over-explaining... but I cannot stress enough how important it is to determine just how much equipment you need to purchase and how much prior planning/implementation can save you money.
Reducing your needs is key. The order in which you do this has some bearing as well. Conservation is where you start. I wrote several blog entries about conservation in 2012/2013. You can find those from the General Store page with the Archived PDFs (click here to go there). Next is to be an Energy Detective and figure out where money is leaking out of your house in the way of air gaps and ineffective insulation. Again, an entry about this is in that same Archived PDF mentioned previously. You might be able to get an expert Energy Auditor at a low cost if you investigate what programs are available to you.
Then, DO the things you can afford to do and prioritize what is out of your budget for the future. (Do what you can when you can, and, when you can do more, do more.)
Once you've done everything you can to reduce your energy consumption needs, you are ready to think about producing your own electricity and you will have all the information you need to provide to businesses to get cost comparisons.
These days, more utilities/electricity providers are finding ways to reduce their overhead with renewable energy. You might find that your utility company has a package that makes it possible to get a solar array or residential wind turbine that the utility owns and installs at your location at their cost and you purchase the electricity from it a reduced rate compared to the rate of the electricity generated by the utility elsewhere. This solution doesn't take you off grid but it does let you say that most of your electricity is generated by a renewable source.
The Preparation at PlayHaven Farm
Out of the 16 years that we have been at this location, it has taken 12 years of preparation to achieve generating our own electricity at PlayHaven Farm. The progress is well documented on this website and in the archived PDFs of the website. But, for those of you who don't like to click around, here is a basic list of what we did:
- Make a game plan starting from an Energy Audit.
- Change habits in order to use less energy.
- Install energy-efficient alternatives when any electricity-using-item needed replacing.
- Improve the insulation in the structure. Seal air gaps in the building envelope and ductwork.
- Replace the damaged roof with an Energy Star(R) 'Cool' Roof.
- Replace the air conditioner and propane-using-furnace with a ground-source heating and cooling system (geo-thermal).
- Do another Energy Audit to confirm improvements have been effective.
- Contacted Solar companies to get estimates every few years so we had an idea of how much it would cost at that time with the mid-completion consumption numbers.
- Do cost comparisons for grid-connected systems and off-grid systems.
- Be informed about what kind of financial assistance is available (Federal, local, etc.), what tax credits are available, and regarding our particular utility company... what incentives they offer, how net-metering works with them, etc.
Eventually, we were as prepared as we could get and then it all came down to accumulating the necessary funds.
In our case, we were blessed in that our parents lived long, happy lives and, when they died, they had some money leftover which we inherited. It is because of our parents that we were able to invest in a solar array. We are ever so grateful to them.
Phone Calls and Investigation of Businesses
A pre-requisite to solar is a sound roof on which to place it or the appropriate location for a ground mounted system if the cost to put it on the roof is too high and you have the land to do so.
Our house has the TPO product from GAF that was an experiment and has been highly successful in our opinion. The warranty on the product ended in 2024, so I thought it might be likely that we would need to put a new roof before we could consider solar on the house roof. After talking with roofing companies and our insurance company, we decided that the roof on the house is in good shape and shifted our site to the roof of the gambrel barn/garage. You can read and see all about the project of replacing the gambrel barn/garage's roof (and north wall) on it's own page (click here).
I get really nervous searching for contractors since we had a couple of not so great results over the years. I’ve actually found some great contractors for projects as well, but the fear usually overrides my confidence of past experience.
Anyway, I like to get recommendations from people we know and trust. And, I’ve had enough experience working with governmental agencies that I know you have to know the questions to ask because often it is not acceptable for businesses/agencies to offer recommendations – a legal thing.
Utility/Electricity Supplier
My first call was to our electricity supplier: West Central Electric Cooperative (WCEC). A cooperative is different from a for-profit utility and also is not a non-profit organization. All the customers are also owners. It is still a utility that has a specific area to service and we don't have a choice about which utility we can get our electricity from. I personally like that our supplier is a cooperative.
I asked for the Solar person and was transferred to them. I explained we were interested in getting a solar array and that since I have worked in the renewable energy industry they didn’t have to explain the pros and cons of solar to me. Yes, I had been to the WCEC website and used the “how to estimate what you need” app. Thanks. What I really was calling about is finding out which companies are best about working with WCEC. (Not “who should we hire” or “who can you recommend” because they can’t tell me that. But by asking who they like to work with or gets their paperwork in promptly, efficiently, etc. I knew they would tell me businesses that actually are what they should be and work within the system and wouldn’t leave a job uncompleted or (worst-case) be frauds.)
The Solar Person looked through their easy-to-access projects and gave me several names and the companies for whom they work. Top of the list was Shinnova Solar with the comment that their contact person always gets their paperwork done efficiently and in a timely manner.
The Solar Person then went on to tell me how the paperwork/installation works – multiple phases and that I don’t intercede between the solar installer and WCEC. I should decide who I want to work with and THEY will handle everything. Items that are required are engineer plans with: elec diagrams, cutsheets of panel info, cutsheets of inverters (among others). Solar Person told me once the paperwork is submitted (application) and in good order, it’s usually only a week or so for the solar installer to receive the go ahead on the installation. After the installation, the solar installer notifies WCEC with the post construction paperwork, WCEC schedules the changing of their meter to one that does net-metering. An inspection of everything is done and at that point the solar array is ‘turned on’ and we become producers of our own electricity while the sun shines.
WCEC has a type of net-metering in that when the customer's solar array is producing electricity, it is provided to that customer first and any electricity produced OVER what the customer is using is ‘sent back to WCEC’ providing a credit that is applied to the amount of electricity purchased from the utility. At night or on not-sunny-enough-days, we receive electricity from WCEC. We are not paid for any electricity that accumulates past the credited amount – also called 'zero' – within the agreed upon time. However, there could be some carry forward so that the next time period starts with a credit. But basically, other than offsetting what we would normally be buying, we do not receive money from WCEC for any extra electricity they get from us. And we still receive a bill each month – such as the monthly ‘meter fee’ and whatever other fees, taxes, etc.
WCEC is not a progressive energy company. They like buying their power from a commercial supplier and currently give discounts on amounts used above a given amount (like you pay 8cents per unit up to 1000 units and anything over 1000 units is only 6cents). Completely ridiculous because it encourages excessive usage instead of rewarding conservation.
The Solar Person also told me we’ll need liability insurance of $100,000 on any system sized at 10,000 or higher (a COI – Certificate of Insurance) that has WCEC added to it. This is something I do with our insurance agent some time during or after installation.
Insurance Agent
Next I called our homeowners insurance agent. They weren’t familiar with local solar companies, so no joy there.
Friends and Neighbors
Of course, first hand testimonials from friends, family, neighbors is always a good idea when looking for a contractor. The only people I knew (at that time) who had a solar installation did not contract it (their utility company supplied it). So no joy here as well.
Solar Companies
As I may have mentioned, I have contacted companies over the years but many had gone out of business and there are lots of businesses that turn out to be frauds. So I was hesitant to look at any that were not recommended.
I decided to start with Shinnova Solar and checked out their website. I was impressed… they used all the right words and 3rd party certification etc. They also do roofing and I hoped I could get everything done with one business (unfortunately, I had to go elsewhere for the roof, but that is another story on it's own page). So I called and while we played phone tag a few times, we connected within an afternoon. They were very nice and chuckled when I relayed the compliment I had heard from the Solar Person at WCEC. They refered me to a salesperson who would be able to evaluate our site and take care of getting questions answered, etc.
After speaking with the people at Shinnova, I was sold on them and decided to NOT contact any other solar companies.
Working with Shinnova
Salesperson came to our place promptly. I had electricity usage info ready for them. Hubby and I decided that we preferred the array be installed on the gambrel barn/garage and if need be, the flattish roof over the south porch could be included. We would accept a ground mount installation if the barn was not structurally able to be used. The Salesperson was efficient and pleasant. They went through everything to our satisfaction and it was easier on them because we already were sold on solar. We had to move some money to make the 1/3 payment to be maded upon signing the contract but we were ready to sign the contract.
We thought of a couple things we needed answered before we signed the contract and called to ask Salesperson about trenching costs (included), possible solar battery backup and adding a transfer switch so we could plug our mobile gas-generator in on the outside of the house in case of an outage instead of running extension cords through the bathroom window and down the stairs. And so Shinnova's master electrician called us to get the electrical questions ironed out. Nice person who spent about half an hour talking with us about battery options, the EV (electric vehicle) situation and using the vehicle battery as backup power, and adding a transfer switch. Good thing we ended up talking with them too, because we had an old electric service panel (probably the original from 1980s) and it had very few open circuit breakers. We all agreed that adding a new service panel in addition to the transfer switch and a grid interlock switch was the best idea from a safety and cost saving perspective. It added $5,000 to the total cost but since the total is the number that the tax credit uses, we get a little back by doing it with the installation instead of as a stand-alone electric project.
Our system was designed to provide 100% of our electricity needs because that was the way I wanted it. The utility would have preferred we go with 80% (well, of course they would since they don't seem to understand how much they benefit from an 'over-sized' array feeding them the extra electricity for free). We also plan to move from gas-powered to electric-powered vehicles so accounting for that electricity need means not having to add to the installation at a later date (cha-ching). All of this info is provided to explain why our solar array (et al) came to $33,000. Payment was required in four (4) installments. The Federal Tax Credit provides the equivalent of 1/3 of that amount and after other incentives, the actual total was closer to $20,000.
We signed the contract online and met Salesperson to hand them the check the last day of July. We were given the name of our Project Manager who contacted me by phone to talk through the next steps and make the introductions. Project Manager also sent stuff via email so we could get that thread in place and know that the addresses came through and were correct. A couple days later we received a packet in the mail with the printed contract and other information. Everyone assured us that nothing would be installed right away since application and other essentials had to take place first (we were concerned about getting the roof finished before the solar array could be installed). The next step would be the site survey. Plus, it was not a problem that the solar installation wait to follow any roofing/construction... even if the solar project didn't get finished until 2025. From a tax perspective as well. The credit is good for several years. It was also made clear to us that it is not unusual for the preliminary portion of the project (everything before the actual installation of the panels) could take several months (as in three to six months).
The site survey by Shinnova occurred a couple weeks later. We asked the surveyor about the structural integrity of the barn and he seemed to think that it would be fine but confirmation would come from the people who read his report and they make that decision. (As an aside, we had the roofers add purlins because they were originally spaced at 36-inches on center and we wanted better support so ultimately we ended up with purlins spaced at 18-inches on center. We also changed the gauge of the metal panels from 29 to 26 for added strength in attaching the solar panels.)
We received the drawings of the site and the installation information from Shinnova and while it took a few back and forth emails/pdfs to do this, we quickly settled on the final drawings. The 2nd payment was due at this point and Hubby used the digital service provided to make the 2nd payment to Shinnova.
Project Manager contacted me to say that WCEC said they had already issued an application to me. WCEC had sent me the application back when I first contacted them so I could look them over. Luckily I had not done more than copy the pdfs to my computer to look at it because to have opened them would have been problematic. I forwarded the EMAIL (not the PDFs) from Solar Person to Project Manager who provided it to the person that does the paperwork with WCEC. I share this as a cautionary tale to say: keep correspondence, just in case.
Project Manager gave me regular updates on the solar project. Early in September, I got a call from an unkown electrician to schedule the service box replacement and EV charger install saying they work with Shinnova. They would be available on October 16/17 to do our work and would have to turn off the electricity on the 16th. That worked for us and after getting off the phone, I contacted Shinnova and Project Manager confirmed what Electrician had said and told us that they would be doing a site visit to confirm all the details (placement, materials, etc.) and we settled on that date (I think it was the 3rd Friday in September). The nice Electrician did come out and since I know nothing about electricity and Hubby does, Hubby worked with him to establish where the box is, where the outside plug to connect our generator to would go, where the EV charger would be, etc. We all agreed that it would be easier for him to do the EV charger at the same time that the trenching for the solar panel happened because it would mean only one trench. So, instead of the 16th/17th, the appointment became October 16th.
Very quickly after settling the electric, Project Manager told us the application et al had been accepted by WCEC and they could schedule the solar install anytime. I shared that the roof project was delayed and was told (again) not to worry, they would work around the roofer. (Heavy sigh of gratitude.)
Hubby spent several days before the electrician appointment getting what outlet changes he had been planning to do eventually DONE so it would be easy for the electrician to add them to the circuit breakers. (This he had previously discussed with the electrician.)
On our appoinment day, we were all ready for the Electricition and they got right to work. The electricity was out from 11:30 am to 4:00 pm. Electrician was very professional and the installation included a moisture barrier behind the new box (OSB board) and the installation is very neat and tidy. Hubby spent most of the day with Electrician because he enjoys electrical stuff. I took some photos. I spent most of the time doing outside things that did not require electricity. Hubby checked the circuit labeling after Electrician left and found one mislabeled circuit. It was quickly identified and relabeled. (I point this out because no one is perfect and quality control is REALLY IMPORTANT). The transfer switch and interlock (for the generator) was postponed until Electrician came out to install the EV charger because the part was backordered. No worries.
The stress level of both Gary and I diminished noticeably once this appointment was done. It was scary to see just how not to code the old box was when comparing it to the new box. **May 2025 update: Hubby has been doing electrical updates in the house and discovered that the 'ground' and the 'neutral' were one and the same wire in the new service box. No pics, but he has fixed it so that they are separate wires correctly dealth with. And, no, I can't explain it better than that. All I really understand is that while technically sharing the wire is often done, it doesn't stand up to code requirements. Now we are code compliant. He also fixed the ground in the garage and that is shown under General Maintenance.**
Project Manager continued to give me weekly updates and in middle October, everything was in place on their end and we were simply waiting for the roofers to finish so that Project Manager could schedule the installation. We did get a call from Project Manager's Supervisor while we were waiting for the roofers. Supervisor wanted to upgrade our inverters at no charge to us because they had been having problems with the ones they normally use arriving at the job and not working. We chatted for a bit (me, Hubby and Supervisor) and we agreed to the upgrade. The very same day, Supervisor sent us a change order/addendum to the contract that stated what was being replaced with what and how it would be at no additional charge.
As soon as the roofers were finished, I sent an email to Project Manager. It only took a couple days for her to get everyone aligned to do the installation. It was scheduled for December 2nd and 3rd. The materials were to be delivered the morning of the 2nd.
On November 26th, people from WCEC and other services/utilities showed up to mark where buried lines are because Project Manager initiated the ‘call before you dig’ practice. The trench won’t interact with any of them, but it is nice to see the system working.
Project Manager reminded me that once the installation is complete, Shinnova will contact WCEC for an inspection and then WCEC will arrange to change out the meter. The 3rd payment on the solar happens after the inspection shows everything to be complete and correct.
After weeks of unseasonably warm weather, wouldn’t you know that snow was predicted for the weekend but it was supposed to be less than an inch accumulation. Instead, we got at least three (3) inches of snow and the temps for the following several days were not going to get much over freezing during the day. That put a bit of a hitch in the plan.
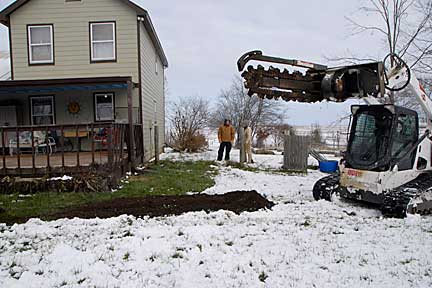
The Solar Installation
The crew showed up on Monday in spite of the snow and decided with the snow on the roof, they would work on the ground and get the trench from the southeast edge of the garage to the east side of the house at the meter dug. Then put in the conduit for the solar wiring while the Electrician put in the conduit (into the trench) for the EV charger wiring.
 |
The trenching process used a ‘bobcat’ ditch digger. The operator of the bobcat was concerned about getting his rig in and out of our property. I watched the driver make turn off the road and make the way up our driveway, gunning the engine and spinning the wheels in the snow instead of downshifting and inching along. Even I was afraid they were going to end up jack-knifed or worse. But, they made it to the garage and unloaded the bobcat; then moved the truck and trailer into the pasture south of the blackberries. |
 |
We discussed the best course of action to get the bobcat into the yard south of the house and decided that opening the drive through gate on the north yard and removing the fencing between the house and the walk through gate between the north and south yards would be the easiest and most direct. Hubby set about taking that fencing out (including the piece of conduit he uses at corners) while the crew got started checking for buried wires and marking the ground. |

We were surprised to find there is a buried electric line in addition to the one that goes to the old well (Hubby had that one marked). Once we saw the line, it was clear that the former owner had at some time used it for the electric fence for the horses (when we bought the house, that electric fence was connected at the garage). For future knowledge, the defunct white coated electric line goes from just south of the meter and about 2-feet east of the house in a southeasterly direction… it probably ends at the corner post that became the “T” between the big dog yard and the backyard. |
 |
 |

|
Before they could start the trench, the bobcat operator needed to use the bucket attachment to move the gravel away where the driveway and parking spot are between the garage and the yard.
|
 |
The Hubby had shoveled the path he anticipated the crew would use for the trench and it was perfect. |
 |
The bobcat operator had no trouble getting the bobcat into the yard. |
 |
The digging started at the west fence (this is done going backward) and followed the route laid out by the Hubby and crew. |

It was interesting to watch the bobcat operator use the chain-saw-like ditch ‘witch’ to extend the trench under the fence before heading east/northeast across the yard. |

|
 |
 |
 |
Care was given to making the turn gradual so the conduit would be a sharp angle (hard to pull wire through corners).
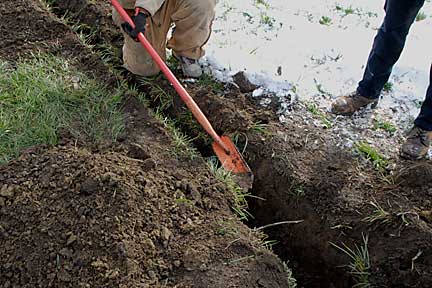
The bobcat operator left the spot where the wire to the well is undug and the crew used specialty shoves to dig around the wire to the depth the ditch ‘witch’ created. The crew did the same thing up close to the house. |
 |

|
 |

|
 |
The bobcat operator then made their way back to the driveway side of the yard and did the same technique to get under the fence and connect to that part of the trench before moving westerly to the southeast corner of the garage. |
 |
 |
 |

|
| |
|
| |
|
 |
Once this part was done, the bobcat was left off to the side to wait for the job of moving the dirt back into the trench on top of the conduit.
You can see that hand digging was also required at the south-eastern edge of the garage. |
 |
Once the trench was done, both crews laid out lengths of plastic tubing conduit to make sure they had enough and created the turns and glued them together. |
 |
 |
 |
 |
 |
 |
As soon as the tubing was glued together and settled into the trench, the bobcat operator put the bucket on the bobcat and used it to slide the dirt on one side into the trench (forward) and then the other side (backward).
The bobcat operator did an excellent job and did very little damage to the grass because of the snow layer.
There is a mound of dirt above the trench so that the dirt can gradually settle and not leave air gaps. |
 |
 |
 |
|
|
 |
 |
The bobcat operator did the same thing in the driveway area, except that the previously-moved-out-the-way-gravel was then smoothed back over the trench area, almost as good as it was before.
The operator worked with the crew the rest of time they were here on Monday.
The driver was afraid getting stuck on the road because of the snow. (More likely it would be because of people who spin their tires and create ice on the road.)
They did not have any trouble (but I did hear the engine whine as the tires spun, oy vey). |
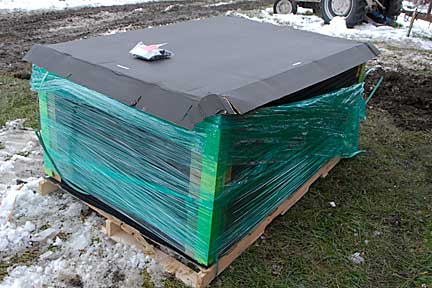
| Sometime during the trenching and pulling of wire, the solar panels et al were delivered. |
 |
 |
 |
 |
 |
Electrician and his helper discovered after they had their conduit in place that they did not have enough wire so they left early and would have to come back to finish their portion of the job. Project Manager coordinated that they would return on Friday to finish their portion of the installation.
The solar crew also left around 1 pm since they couldn’t get on the roof safely – some of the snow had blown/melted off on the east face, but not all of it, and the west face was still fully covered. So Monday turned out to be a half-day instead of a full day due to snow.
The crew came back on Tuesday (sunny and still cold) and worked on pulling wire.
 |

|
| |
|
 |
The foreman worked on the conduit (metal up the outside of the south barn wall) from the junction box to the roof. |
 |
One crew-member did a lot of the inside the house prep and worked on the outside by the meter getting the inverter and shut-off started.
The other crew members installed the brackets on the metal roof. |
 |
 |
 |
 |
| |
|
 |
Then the railings that attach to the brackets. |
 |
And, finally, the solar panels that attach to the railings (and each other). By the end of the day, they had eleven (11) panels in place and connected. |
 |
 |
 |
I asked about the uneven railings and was told that is 'wiggle room' and would be cut off once everything was in the final position. |
The crew could not come back on Wednesday because the job they had done in St. Louis was being inspected and that regional utility requires the crew to be on site for the inspection.
They would be back on Thursday to finish the installation. |
 |
 |
 |
In the meantime, I had gotten a call from a photographer on behalf of Marketing for Shinnova asking if I would do an on-camera testimonial. Sure, no problem. They would come to the house on Wednesday for that and return after the completion on Thursday to get drone-aerial images of the installation.
Wednesday brought sunshine and 50 degree Fahrenheit temps. The rest of the snow melted off the roof and I enjoyed a couple of hours doing the testimonial and chatting with the photographer (who is an artist working as an independent contractor for Shinnova). I missed the return visit late on Thursday but got a text saying they would send me files of the drone footage for my website.
These are on Instagram (as of March 13, 2025). If you don't have an account, you can still see them:
|
 |
Thursday brought back frigid temperatures and a slight wind. I really felt for that crew!
I wasn’t able to photograph the west side installation as it happened (no clear sight line).
It took most of the day to get the nine (9) panels et al installed and the twelfth (12) panel on the east side, plus cutting off the excess railing and connecting all the wires to those going through the metal conduit to the junction box and on to the inverter. |
 |
 |
 |
 |
 |
As one crew-member cleaned up the site, the inside crew-member took Gary and I through the app that shows information about the operation of the system and we were excited to see the proof that the panels were already generating electricity (for the test at least).
Then we went downstairs to see the new breakers in the house and back outside to see the shut-off that is on the outside of the house.
The solar installation was officially ready for the utility company.
We sent the crew away with a jar of honey each (as a tip) as is our custom. |
 |
Transfer Switch, Interlock, and EV Charger
The Electrician and helper came back on Friday morning. They ran the wires through their conduit for the EV charger, wired the junction box at the garage, put a hole into the south wall of the garage and ran the 240 amp ‘able to be exposed’ wire from the junction box to where the EV charger junction box is by the south garage door.
Then they installed the transfer switch for connection from the generator to the service panel and an interlock that slides over the utilities incoming power breakers while the generator is in use (to ensure the service from the utility is not accidently turned on).
 |

The Transfer Switch is simply the exterior access junction box where you plug in the extension cord from the generator. The access is on the bottom of the box and requires a special type of extension cord. |
 |
Note that the ORANGE wire connects the Transfer Switch to the generator circuit breakers.
You can see the solar connection has the red caution warning on that conduit.
The conduit for the wiring to the EV Charger is to the right of the solar conduit and closer to the Transfer Switch wire.
|
 |
 |
It was about 2:30 pm when they left saying they were all finished. I didn’t think it would be necessary to check on the truth of that statement and would simply get photos later. Hubby went out a few minutes later and came back in to say that the EV charger had not been installed – it was just a junction box with a cover that said: “for future EV”. Gary took pictures of the wires inside and we sent off a note to the Project Manager saying we were confused. While waiting for a reply, we checked the contract and it clearly states that an EV Charger would be installed – not wiring for a future EV charger.
 |
 |
Foolishly, we had just assumed that Shinnova would install their EV Charger – or I should say whatever EV Charger they consider to be standard. We never thought to ask about what they would be installing. The Electrician had chatted with Gary about our EV needs and we were upfront about not having one now and what we plan to include; but he never actually asked us which EV Charger we wanted installed. By the time the Project Manager got back to us (later that day), we both had researched what we should have specified in the first place and that being a ChargePoint charger that is hardwired and adaptable for a variety of vehicles.
The Project Manager is coordinating with the Electrician when they will come back to install the charger. Likely it will be after the New Year.
The 3rd invoice was due once the solar panels where installed and we paid that.
While we were waiting for WCEC to schedule the inspection, the Hubby had a chance to get accustomed to the app that shows the information from the Tesla inverter and discovered that an additional piece is needed to monitor actual usage by us from what is being supplied from the solar array. We contacted the Project Manager about adding that to our contract and to ask what the price would be. Considering what the entire installation is, we decided the $350 price tag is definitely worth it. So we asked Project Manager to add it to the contract since we were still waiting on the EV Charger/Installation.
The inspection was scheduled for December 19th.
WCEC came out as scheduled (9:15 am). Shinnova sent a man to be here for the inspection. Once the utility declared that everything was in order and correct the old meter was switched out for the new meter. It was basically a matter of turning off the power from the utility, unplugging the old one, plugging in the new one and reestablishing our power from the utility. Much simpler than I was expecting.
Shinnova did the official flipping of the switch to make the solar array LIVE to the service panel.
Reading the new meter is ... interesting and very odd. It is odd in that the information is:
- The big numbers at the top are an accumulation of BOTH the electricity that the solar array produces and sends through the meter (to WCEC) and the electricity that WCEC sends through the meter for us to use. We have to go to the on-line information at the WCEC website to see the breakdown of what makes up that number. However, the electricity that goes from the solar array to our service panel (that we use) does not show up on the meter at all – it doesn’t go through the meter unless it is in excess of what we are using at the moment. (Which is why we need the Tesla monitor.)
- There are two words that are important: Received and Delivered. These words are from the perspective of WCEC. In addition, there are 3 dashes that light up in succession from left to right OR from right to left depending on whether electricity is being Received by WCEC (excess solar beyond what we are using) or Delivered by (from WCEC because we need more than the solar is supplying to us). If the dashes do not appear at all, that means the service panel is using solar without receiving additional from WCEC or sending excess to WCEC.
On the 23rd of December, Solar Person sent us a copy of the net-metering agreement with all the drawings etc. It gave us the excuse to call him to ask about a code showing up on the meter (AD’1) and our confusion with the on-line information (we left a message in the morning and they called that afternoon). Solar Person was very nice and also somewhat concerned when Hubby pointed out that the agreement had old information. They appreciated the information and told us they would get the accurate information from Shinnova. We received the amended net-metering agreement on December 26th.
We also received the final invoice from Shinnova. I contacted Project Manager because we are concerned about paying the invoice when there are still action items undone. I told them we had not received the addendum (additional cost) nor has the EV Charger been installed. We were told they are working on those and understand our delay in paying.
As I was writing all this up for the website, I came across the insurance requirement of WCEC and so I contacted our Insurance Agent about the amount they require and adding them to the policy. Insurance Agent told me the amount required by WCEC is covered in our policy and all they need to add WCEC to the policy is the address of WCEC, which I have supplied. Insurance Agent asked for photos, technical info and the value of the solar array so that the insurance could be updated to include it; which added about $250/year to our premium.
Completion of the Project
On January 18, 2025, the Project Manager's Supervisor (the same person that contacted us about upgrading our inverter) and the Solar Electrician (the person assigned to our system and who comes out to do any future tweaks, repairs, etc.) came out to finish the installation of the EV charger and Tesla meter.
I had previously begged the Supervisor to bring out his dogs so I could get a “fix” when they came out and he did! They had so much fun running through the snow in our big, fenced yards. I enjoyed the snuggles and it was a joy to see them playing. I do so miss my dogs.
 |
 |
The charger they installed was what we requested. We know it isn’t the ‘latest and fastest’ charger, but we plan to purchase older vehicle/machines so we know this one will work on what we purchase.
The meter installation required some shuffling of circuit breakers and there is now a little antenna on the side of the box. |
 |
It seemed like it took them no time at all to finish up and I was sad to see them leave.
Supervisor stopped by in February to give us a couple little things he 3D printed:
- a hook for the EV charger cord(?) and
- a little thing to put under our garage door so we can use the charger with the vehicle outside and the door closed – so the door won’t pinch the cord.
What a considerate thing to do.
Hubby paid the final invoice as soon as the EV charger etc. were done. |
Over the last two (2) months, we have enjoyed getting to know the Tesla meter app.
We compare it to the bill from WCEC and it is nice to know that they match up. The app is great, I now can schedule my heavy electricity use while the sun is shining so that I know for sure our electricity DOESN’T come from fossil fuels or nuclear power.
We also love that we can see in real time what appliance is drawing a bunch of electricity (spikes that we can see happen during a specific time). It is also great to see that ‘bell-curve’ of when and how much is generated during the day.
We had another round of artic frigid temps and discovered that by using the fireplace wood stove insert (and it’s room fan), we could lower the REALLY HIGH amount of electricity that the geothermal’s auxiliary heat strips require.
**In case you cringe when you read 'Tesla', please remember that the guy that is probably the reason you cringe did not start the business. He bought it and is now ruining the good name of Tesla with all his 'antics'. I don't say or write his name so that I don't give him any energy. We are just as put-out about him and his 'boss' as should every USA citizen that loves Freedom and has Empathy.** |
 |
On the 3rd of February, I was contacted by a company claiming to be the tax people for Shinnova. So as before, I contacted Shinnova to ask if they were what they claimed to be. The answer was yes. I called the Tax People back and the man walked me through how they get the paperwork to us to claim the energy tax credit on our taxes. The next day I used the link he provided and downloaded their stuff. Happy to have it, but unhappy because the Tax People triggered the ‘shysters’ red flag. Reminded me of the pyramid scheme tax folks that the Debacle Company founder had been part of (don't worry if you don't understand that statement...). Lots of sales pitch and scare tactics. I did not fall for it and won’t recommend them.
That tax info was timely because I was putting our return together (I use TurboTax for Business on my CPU.) and was able to plug in the energy credit info. Be forewarned… just because a 30% credit is available to you, that doesn’t mean you will be able to apply the entire thing if your tax due isn’t large enough. For example, our tax responsibility ended up being such that we could only claim $988 of the $10,000 available to us in 2024. The balance is carried over to the next year and will continue to do that through whatever time is left to claim energy tax credits. It won’t increase your refund (if you overpaid on your tax responsibility). So when someone says you should consult your tax advisor, you really should consult your tax advisor. Happily, for me the energy credit was just icing on the cake and not the reason for the installation.
As of today (the 25th of February), we have finally gotten to the point where we are off-setting 100% of our electricity usage. Of course, that all depends on the weather. But we are grateful for our solar array.
All in all, the installation is complete and we are completely satisfied with it.
If you want Shinnova to do YOUR solar installation,
here is a link that I will get credit for referring you to them: https://snoball.com/s/GqzE95 |


