Moving the Strawberries into the New Raised Beds (Spring 2021) |
|
When we created this raised bed for strawberries back in 2014, I was overly optimistic about my ability to use my kneeling pad to work on the beds and harvest.
Between the pain of my knees and back et all from bending over so much, I was all to happy to see at the Persimmon trees (just to the right of this bed) had by 2020 finally gotten so big that they overly shaded the bed through the summer.
Some shade for strawberries (and rhubarb) is fine, but it had become a dense shade. The rhubarb died and while the strawberries were still doing OK, it was just the excuse I needed to get the plants moved to the new raised beds that were finally ready for them.
Note that this raised bed is only two (2) 2x6 boards high and the supports are on the outside (other than the corners). The new beds are three (3) 2x6 boards high and the supports are on the inside.
I started transplanting the usual way: one plant at a time into our sled until I had enough for one row spaced about what you see in the photo from 2014. Pull the sled over to the new bed and put the plant in place. Because I had to use the kneeling pad on the old bed, I just moved it to the new bed to put the plants in place. Well, at first that is what I did. I had moved the rolling seat into the shade and was spending so much time in 'recovery-mode' that I shifted it to use for putting the plants into the new bed. |
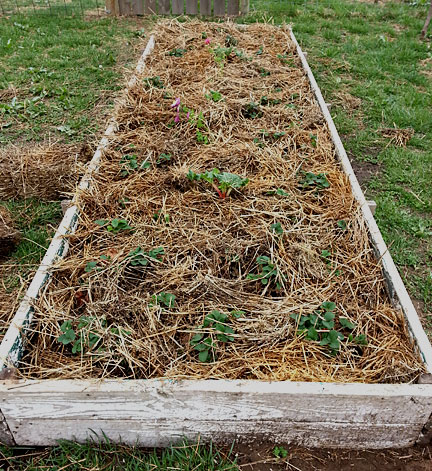
Eventually, I was able to get the new raised bed to look like the old bed (photo above) and I had only pulled about 1/8th of the plants out of the old bed. That old bed was definitely overgrown and needing to be split into multiple beds!
I used loose straw around the newly transplanted strawberries in the new bed (#1), watered it in really well and chucked the idea that I could continue transplanting the strawberries the way I had because it took me ALL DAY to do just that little bit.
Happily, those transplanted strawberries were REALLY happy in their new bed and actually produced berries enough that they compensated for the old, overcrowded, over-shaded bed. So I had time to consider a different way to transplant the rest the following Spring. |
 |
I should also say that the old 2014 strawberry bed had settled so much that we could have taken the top board away and not exposed the soil at all. Basically there was about five inches of soil with strawberry plants in it.
Luckily, the new raised beds had compressed about five inches below the edge of the top board as well. Wouldn't it be great if we could just sliced through the soil below the plants and shift them with the soil to the new beds?
And that is what we ended up doing. The hubby cut clumps of soil with the plants in them ... |
 |
and placed those clumps into the sled for transport ... |
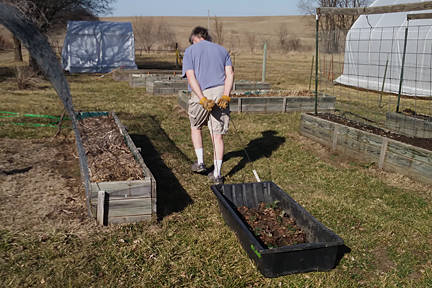 |
hauled the loaded sled to the new bed ...
(I did this for most of the trips, but the hubby did this one so I could take pictures.) |
 |
where I unloaded the clumps and pressed them into the watered-in soil of the new bed (that is key, by the way: the soil was saturated with water FIRST).
He rested while I hauled, planted and brought back the now empty sled. And I rested while he cut the clumps and loaded the sled. |
 |
How did he cut those clumps? My hubby is a very clever fellow.
We have several tools designed for other uses that he employed.
A machete was used (see photo at left) first to mark and then hold in place where the board would be so he could cut down into the soil along a straight line all the way from one side to the other. |
 |
Then he used a grass/turf edger/cutter to cut that straight line along the board the depth of the cutter (about 5 inches). |
 |
Once he had the entire line across cut, he placed a second turf cutter up against the board at the opposite end from the machete to keep the board in place. |
 |
He used the first cutter to make 'slices' perpendicular to the first cut and he used the cutter to measure how wide that slice of soil and plants should be. |
 |
Once all the slices were cut, he removed the machete and 2nd cutter. He then used the machete parallel and close to the ground to cut under the plants and loosen those slices from the soil below. |
 |
Once he had it loose, he slid the 1st cutter under a single slice (which was exactly the size of the cutter because he used it to measure the size of the slices) and lifted that slice into the sled to await transport.
When either the sled was full, the row completely moved into the sled, or the sled was really heavy (but not enough that it would hurt me), I would haul the sled over to the new bed and once again place/press the slices of soil/plants into the watered-in soil of the new bed.
And the hubby would rest and wait for me to return with the sled. |
 |
In this way, we each were able to take regular rests. Regardless of that, this was a major task and the further into the bed he cut, the more difficult it became.
We decided when he got to the middle of the bed, he would switch sides and work again from the outside in. This did make it easier.
As you can see, we decided to stop for the day at the 3/4 mark because we were both tired and we had filled the 2nd of the new strawberry beds.
We finished up the next time by putting the remaining plants in among the 1st bed (that I had transplanted the previous year). I had been so generous with spacing that there was plenty of empty areas to put those slice of soil/plants. |
There was extra soil from the old be that we used to fill in around any clumps that needed extra space (augmented with soil from the big pile). When we had completed each day's work, I once again fully watered each now transplanted bed. One of the benefits of raised beds is that it is REALLY difficult to over-water anything. When in doubt about watering in a raised bed, err on the side of over-watering because the seepage into the soil below and out from between the side boards will keep it from being a problem. That being said, the soil were we are has a high clay content, so a well watered bed will retain moisture longer than you might think. It is worth investing in a moisture content tool to see what is happening more than an inch below the surface.
The four (4) long 2x6 boards and the four (4) short 2x6 boards from the old 2014 bed were freed up to be used to make the inside raised beds of the hoop house. (See the page about Raised Beds to see that and other photos/info about the permanent wood raised beds.) |


